•Configuring Scan of Protected Connections.
•Adding a Dr.Web Certificate to the Trusted Certificate List.
•Adding a Dr.Web Certificate to the Trusted Certificate via the Command Line.
On the Network tab, you can enable the network connection monitor SpIDer Gate to scan traffic transmitted via secure connections that use SSL- and TLS-based protocols.
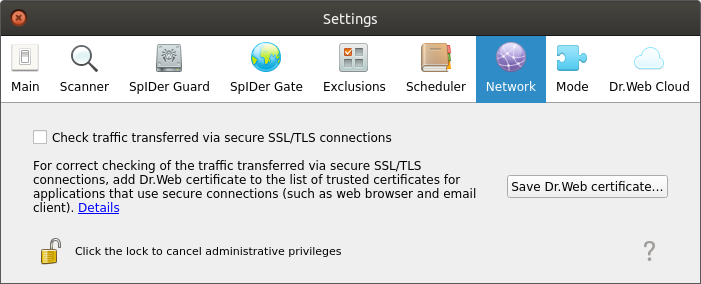
Figure 49. Secure connections checking configuration tab
Configuring Scan of Protected Connections
To allow SpIDer Gate scan traffic sent via protected network connections that use SSL and TSL protocols, select the Check traffic transferred via secure SSL/TLS connections check box. To disable the scan of protected traffic, clear the check box.
|
To manage the scan of protected traffic, the application must operate with elevated permissions. Refer to Managing Application Privileges section.
If a mail client using IMAP for receiving messages (for instance, Mozilla Thunderbird) is running on your system, restart it after the mode Check traffic transferred via secure SSL/TLS connections is enabled. |
To ensure correct scan of the traffic, transmitted via protected network connections, export the special Dr.Web certificate to a file and then manually add it to the list of trusted application certificates that use protected connections. Such applications are primarily web browsers and mail clients. Otherwise, if Dr.Web certificate is not added to the trusted list, data will be displayed incorrectly if received from the website accessible via HTTPS (for example, from online banking websites, web interfaces of mail servers). If the certificate of Dr.Web is not added to the trusted certificate list of the mail client, authorization on mail servers that use protected protocols (such as SMTPS) for data transfer will fail.
To export Dr.Web certificate to the file, click Save Dr.Web certificate and in the appeared window specify where to save the file. Its default name is SpIDer Gate Trusted Root Certificate.pem, but you can change it if required.
Then manually add the saved file of the Dr.Web certificate to the trusted certificate lists of those applications which fail when trying to establish protected connections. You need to add the certificate only once for an application. If you clear and then select the Check traffic transferred via secure SSL/TLS connections check box again on the Network setting page, you will not need to save Dr.Web certificate once again and add it to the list of trusted certificates.
Adding a Dr.Web Certificate to the Trusted Certificate List
Mozilla Firefox browser
1)Select Preferences item of main menu and then (on the appeared settings page) select Advanced. Another page opens, where you need to select Certificates.
2)Click the View Certificates button. In the appeared window, open the Authorities tab and click Import.
3)In the appeared window, specify the path to the Dr.Web certificate (by default, its file name is SpIDer Gate Trusted Root Certificate.pem) and click Open.
4)In the appeared window use the check boxes to specify the required trust level to the certificate. It is recommended to select all three check boxes (for identification of websites, identification of email users, and for identification of software). After that, click OK.
5)In the trusted certificate list, a new section, DrWeb will appear. This section contains the added certificate (SpIDer Gate Trusted Root Certificate by default).
6)Close the window with the list of certificates by clicking OK and then close the page with browser settings (by closing the corresponding tab on the browser tab bar).
Mozilla Thunderbird mail client
1)Select Preferences item of main menu and then in the settings window click Advanced. In the appeared page, select Certificates.
2)Click the View Certificates button. In the appeared window, open the Authorities tab and click Import.
3)In the appeared window, specify the path to the Dr.Web certificate (by default, its file name is SpIDer Gate Trusted Root Certificate.pem) and click Open.
4)In the appeared window use the check boxes to specify the required trust level to the certificate. It is recommended to select all three check boxes (for identification of websites, identification of email users, and for identification of software). After that, click OK.
5)In the trusted certificate list, a new section, DrWeb will appear. This section contains the added certificate (SpIDer Gate Trusted Root Certificate by default).
6)Close the window with the list of certificates by clicking OK and then close the page with mail client settings by clicking Close.
7)Restart the mail client.
Adding a Dr.Web Certificate to the Trusted Certificate List via the Command Line
Besides the graphical user interface, you can use the command line to add Dr. Web Certificate. To generate a certificate, perform the following command (you need to specify the name under which the certificate in PEM format will be saved):
$ drweb-ctl certificate > <cert_name>.pem |
After that add the certificate to the system storage. This operation is performed by means of different commands in different Linux distributions. In Ubuntu, Debian, Mint:
# cp <cert_name>.pem /etc/ssl/certs/ |
In СentOS and Fedora:
# cp <cert_name>.pem /etc/pki/ca-trust/source/anchors/ |