In this section
If Dr.Web Security Space is connected to a centralized protection server, you can use an interface to view messages on the state of the anti-virus network that are sent by the centralized protection server to the controlled workstations. An anti-virus network administrator can use this tool to monitor the network state and important events related to the operation of the centralized protection server.
The messages on the network state and events are sent to a workstation only if the anti-virus network administrator configured the corresponding setting on the centralized protection server to which Dr.Web Security Space is connected. Otherwise, the messages cannot be viewed and the corresponding page is not displayed on the Dr.Web Security Space main window. |
The interface for viewing messages from the server is displayed on a separate page. To open this page, click ![]() on the navigation pane.
on the navigation pane.

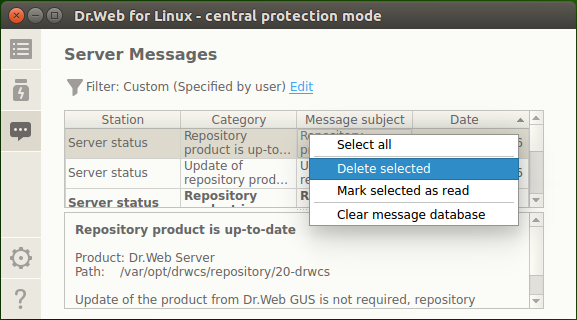
Figure 33. Messages from the centralized protection server
For each message on the list, the following information is available:
•name (address) of the workstation that is mentioned in the message;
•message category;
•message title (subject);
•date and time of sending the message by the server.
To view the message, select it from the list. The text of the selected message will be shown on the pane under the message list. Unread messages are in bold.
The text of the messages about the state and events of the anti-virus network is in the language that is specified in the centralized protection server settings. |
To apply an action to a message, right-click the row with the information about the message and select the required action in the drop-down list. If you need to apply an action to several messages, select them in the list before activating the drop-down list. To select several rows, hold CTRL or SHIFT:
•When you hold CTRL, messages are selected one by one.
•When you hold SHIFT, messages are selected contiguously.
To select all messages, press CTRL+A.
The drop-down list contains the following actions:
•select all filtered messages in the list;
•delete the selected messages;
•mark the selected messages as read;
•purge the message database.
If you purge the database, all received messages are deleted (including unread messages).
The messages received from the centralized protection server are automatically deleted at the end of the maximum storage time that is specified in settings. |
Since the server can send a significant number of messages, you can filter them by a sending server address, an anti-virus network workstation name, a message category or a receiving period. By default, the enabled filter shows all categories of messages received from all servers during the current day.
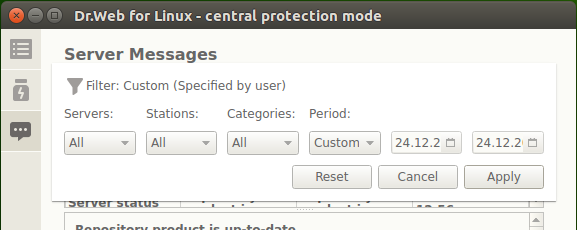
If necessary, you can edit the message filter. For that, click the Edit link. After that, the filter pane opens at the top.

Figure 34. Message filter pane
On the filter pane, you can specify the following filtering parameters:
•Servers—a list of servers from which the messages are shown.
•Stations—a list of workstations about which the messages are shown.
•Categories—a list of message categories to show.
•Period—a generation period of the messages to show. You can select a standard period from the list or you can specify specific start and end time of the generation period.
To save changes to the filter, click Apply. To close the filter pane and discard the changes, click Cancel. To reset the filter to the default values, click Reset.