SpIDer Guard is enabled automatically after you accept the License Agreement. The component keeps protecting the file system even if you close the application. If SpIDer Guard is enabled, the Dr.Web icon ![]() is displayed on the Android status bar.
is displayed on the Android status bar.
On some devices, the Dr.Web icon may not show when the app is functioning in the background. It happens because the device firmware optimizes background processes to save power or improve performance. To pin the Dr.Web icon to the Android status bar, remove background app restrictions: check your device settings and the built-in app manager settings. The settings may vary by device. Oftentimes all you need to do is tap the lock icon next to the Dr.Web app in Recent apps.
SpIDer Guard protects the file system even if the Dr.Web icon is not displayed on the Android status bar. If you install a malicious app, the component reacts and shows a notification about the threat. You can test SpIDer Guard by using the EICAR test file.
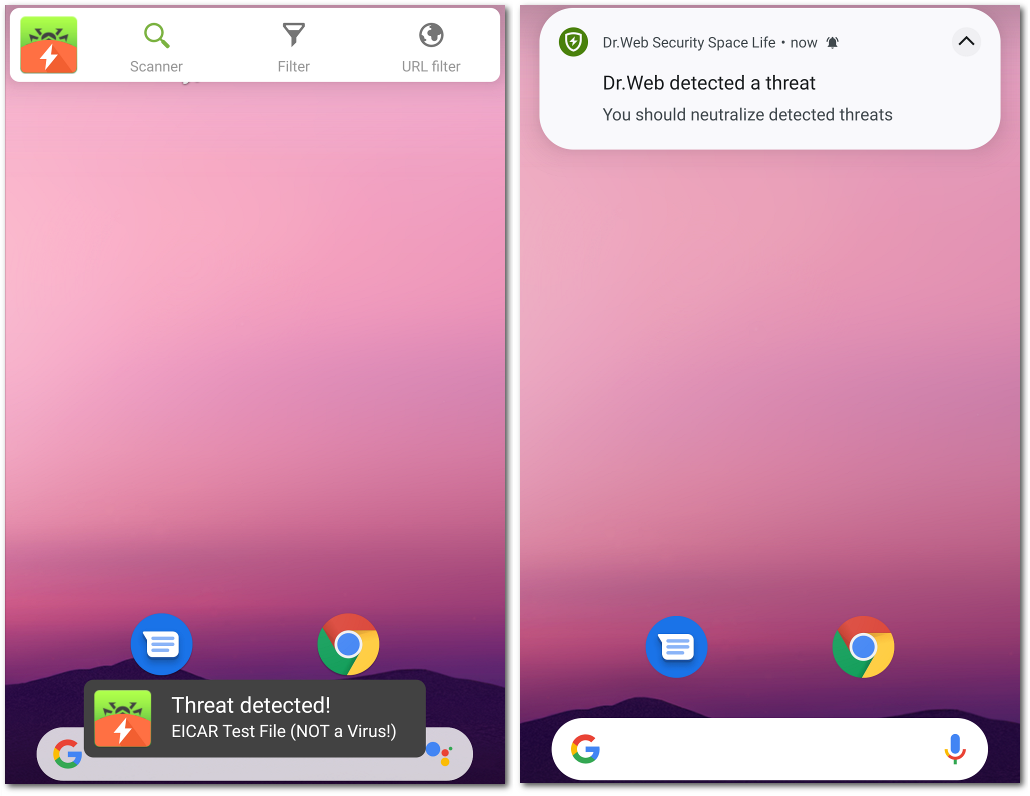
If SpIDer Guard detects a suspicious change in the system area or a threat, the following items appear on the screen:
•An icon on the Android status bar in the top-left screen corner:
▫![]() on Android 5.0–11,
on Android 5.0–11,
▫![]() on Android 12 or later.
on Android 12 or later.
•A pop-up notification about detection of a threat (see Figure 13).
•The ![]() (on Android 11 or earlier) or
(on Android 11 or earlier) or (on Android 12 or later) icon on the notification bar.
•A message with a red indicator on the status bar.
To open check results, tap the ![]() (
() icon or the status bar message.
SpIDer Guard will stop working if the internal device memory is cleared using the default Task Manager. To restore real-time anti-virus protection, open Dr.Web again. |
To disable or re-enable SpIDer Guard
1.On the Dr.Web main screen, tap Menu ![]() and select Settings.
and select Settings.
2.On the Settings screen, tap SpIDer Guard.
In the centralized protection mode, some features and settings of SpIDer Guard may be modified and blocked for compliance with the company security policy or according to the list of purchased services. |
To open SpIDer Guard settings
1.On the Dr.Web main screen, tap Menu ![]() and select Settings.
and select Settings.
2.On the Settings screen, tap SpIDer Guard.
Files in archives
Select this check box to enable scanning files in archives.
By default, scanning of archives is disabled. Enabling archive scanning may impact system performance and increase power consumption. Disabling the scanning does not decrease the protection level because SpIDer Guard checks installation .apk files even if the Files in archives option is off. |
Built-in SD card and removable media
Select this check box to enable scanning of the built-in SD card and removable media on each mounting. The scan also starts every time SpIDer Guard is enabled. You will see the corresponding notification.
System area
Select these check box to monitor changes in the system area. SpIDer Guard will notify on deletion, addition and change of executable files: .jar, .odex, .so, APK, ELF files, etc.
Recheck system area
Tap this button to recheck the system area. SpIDer Guard will notify you on all changes that were ignored previously.
Notifications about system area
Select this check box to enable notifications on changes of any files in the system area (not only executables).
If Dr.Web uses centralized protection mode and connects to the server version 13.00.1 (17-03-2025 03:00:00) or earlier, instead of this option you will see Additional options. |
Select this option to set up actions automatically applied to the detected threats (see the Check Results section).
Additional options
You can see this option only if Dr.Web uses centralized protection mode and connects to the server version 13.00.1 (17-03-2025 03:00:00) or earlier. In other app versions, Actions appears instead. |
Choose this option to enable/disable detection of files that might threaten your device and select the corresponding check boxes:
•Suspicious objects,
•Adware,
•Dialers,
•Joke programs,
•Riskware,
•Hacktool programs,
•Exploitable software.
The application registers events related to the operation of SpIDer Guard: enabling/disabling of SpIDer Guard, threat detections, and check results of the device storage and installed applications. SpIDer Guard statistics appear in the Events section of the Statistics tab and are sorted by date (see Statistics).
You can test SpIDer Guard by using the EICAR test file. The file is usually used to:
•Check if the anti-virus software is installed correctly.
•Show the anti-virus reaction if a threat is detected.
•Check the enterprise procedures if a threat is detected.
The file is not a virus. It does not contain any fragments of a viral code. Thus, it is absolutely safe for your device. Dr.Web detects the file as “EICAR Test File (NOT a Virus!)”.
You can download it from the internet or create it by yourself:
1.In any text editor, create a new file which includes only the string:
X5O! P%@AP[4\PZX54(P^)7CC)7}$EICAR-STANDARD-ANTIVIRUS-TEST-FILE!$H+H* |
2.Save the file with the .com extension.
As soon as you save the EICAR file on your device, a warning message appears.
