SpIDer Agent helps you configure and manage Dr.Web components. When SpIDer Agent is running, its icon displays in the notification area of the Windows taskbar:
![]()
|
If SpIDer Agent is not running, in the Windows Start menu, select the Dr.Web application group and then select SpIDer Agent. |
The icon indicates the status of Dr.Web:
| • |
| • |
| • |
If you move the pointer over the SpIDer Agent icon ![]() , you receive information on running components, last update date and number of records in Dr.Web virus databases. Also notifications may appear here if configured.
, you receive information on running components, last update date and number of records in Dr.Web virus databases. Also notifications may appear here if configured.
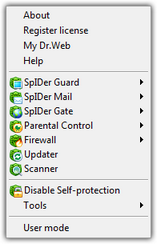
To access Dr.Web configuration and management features
| 1. | Click the SpIDer Agent icon |

| 2. | Use the following options to configure and manage Dr.Web: |
Menu item |
Description |
||||
|---|---|---|---|---|---|
About |
Opens a window with information about your version of Dr.Web. |
||||
Register license |
Starts the registration procedure for receiving the key file from the Doctor Web server. |
||||
My Dr.Web |
Opens your personal web page on the official Doctor Web web site. This page gives information about your license (period of usage, serial number), allows to renew your license, contact Technical Support, etc. |
||||
Help |
Opens Dr.Web Help |
||||
SpIDer Guard, SpIDer Mail, SpIDer Gate, Parental Control, Firewall |
Allow you to access management and settings features as well as statistics of the corresponding components. Available components are determined by the type of your anti-virus solution. |
||||
Updater |
Opens the Dr.Web Updater window where you can start an update. |
||||
Scanner |
Starts Dr.Web Scanner. |
||||
Disable/Enable Self‑protection |
This item is not available in User mode. Allows to disable or enable protection of Dr.Web files, registry keys and processes from damage and deletion. Self-protection is enabled by default. |
||||
Tools |
Opens a submenu providing access to:
|
||||
Administrative/User mode |
This item displays when you do not have administrative privileges. For instance, this item displays when you log into Windows XP operating system as a non-privileged user, or when User Account Control of Windows Vista or Microsoft Windows 7 operating system is enabled. Otherwise, the item is hidden and SpIDer Agent menu provides access to all features all the time. The Administrative/User mode item allows you to switch between full-function Administrative mode and restricted User mode. In User mode, access to settings of all components is forbidden, as well as disabling of all components and self-protection. You need administrative privileges to switch to Administrative mode. |
|
To disable some Dr.Web components, it is required to enter confirmation code or password (if you set Protect Dr.Web settings by password checkbox on the Self-protection page in Dr.Web Main settings). |
|
Self-protection helps preventing malicious or accidental modification of Dr.Web components. We recommend you to keep self-protection enabled at all times. |
This option is not available in User mode. |
| 1. | Click the SpIDer Agent icon |
| 2. | Enter the confirmation code or Dr.Web access password. The Disable Self-protection item in the menu changes into the Enable Self-protection item. |
|
If any problems occur during operation of defragmentation programs, disable self-protection temporary. |
To rollback to a system restore point, disable self-protection. |
To enable self-protection
Click the SpIDer Agent icon ![]() and select Enable Self-protection. The Enable Self-protection item in the menu changes into the Disable Self-protection item.
and select Enable Self-protection. The Enable Self-protection item in the menu changes into the Disable Self-protection item.