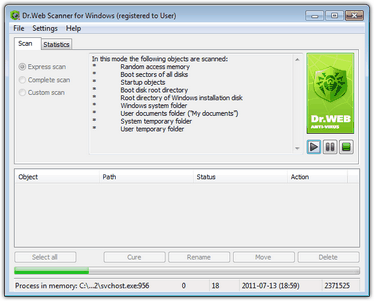
By default, Dr.Web Scanner uses all detection methods to detect viruses and other malicious software. While scanning:
| • | Executable files processed with special compression utilities are unpacked and scanned |
| • | Files within common archives are scanned (ACE, ALZIP, AR, ARJ, BGA, 7-ZIP, BZIP2, CAB, GZIP, DZ, HA, HKI, LHA, RAR, TAR, ZIP, etc.) |
| • | Files within file containers are scanned (1C, CHM, MSI, RTF, ISO, CPIO, DEB, RPM, etc.) |
| • | Messages stored within folders of mail programs are scanned (e-mail should be in the RFC822 format) |
By default, Dr.Web Scanner just informs you when a malicious object is found (except for jokes, riskware and hacktools which are ignored by default). Information on all infected or suspicious objects displays in the report list where you can manually select a necessary action.
You can configure scan settings and Dr.Web Scanner reaction in the settings windows.
To start anti-virus scan
|
When using Windows Vista or later operating systems, it is recommended to run Dr.Web Scanner under an account with administrator rights to ensure utmost scan efficiency, otherwise files and folders to which unprivileged users have no access (including system folders) are not scanned. |
| 1. | Click the SpIDer Agent icon |

| 2. | To manage scanning process, use the following options: |
| • | To scan the objects selected, click Start |
| • | To suspend scanning, click Pause |
| • | To terminate scanning, click Stop |
| 3. | If necessary, stop the quick scan and on the Scan tab of the main Dr.Web Scanner window, select one of the following scanning modes: |
| 4. | Scan results display in the bottom pane of the Scan tab and on the Statistics tab. The report table includes the following information: |
Column |
Description |
Object |
Lists names of malicious or suspicious objects or boot sectors. If malicious or suspicious objects are detected within complex objects such as archives, mail boxes or file containers, the report also lists complex objects containing them. |
Path |
Lists paths to malicious or suspicious objects. |
Status |
For files and boot sectors, lists names of detected threats or their modifications (a modification of a known virus is a code resulting from such alteration of a known virus that it can still be detected, but cannot be treated with the curing algorithms applied to the initial virus) according to the internal Doctor Web classification. For threats within complex objects, lists information on the complex object. For suspicious objects, indicates that the object "is possibly infected" and lists types of a possible threats according to the classification of the heuristic analyzer. |
Action |
Contains information on actions performed (curing, deletion, renaming, moving). If an object is in use (for example, is used by another 32-bit Windows application), no action can be performed immediately. For such objects, the Action column displays the "Will be cured after reboot" or "Will be deleted after reboot" string depending on the Dr.Web Scanner settings. The action is performed after the next system reboot. If such objects are detected, it is recommended to reboot the system immediately after the scanning. |
To access different windows, menus and functions, you can also use hot keys.![]() Details
Details
F1 - Help F3 - Main window, Scan tab F4 - Main window, Statistics tab F5 - Scan path and mask window F7 - Scan RAM and startup objects F8 - Start the automatic updating utility F9 - Scanner settings tabs F10 - Switch to the main menu CTRL+F5 - Begin scanning CTRL+F6 - Stop scanning CTRL+F2 - Clear report list ALT+X - Exit |
|
If your system hasn't been scanned for 7 days, a corresponding notification appears (see Dr.Web License Manager). |
See also: