To manage the anti-virus network and set up Dr.Web Server, the in-built Dr.Web Security Control Center serves.
|
For correct functioning of Dr.Web Security Control Center under Windows Internet Explorer browser, you must add Dr.Web Security Control Center address to the list of trusted sites in the web browser settings: Tools → Internet Options → Security → Trusted Sites.
For correct functioning of Dr.Web Security Control Center under Chrome browser, you should turn on cookies. |
Connecting to Dr.Web Server
From any computer with network access to Dr.Web Server, Dr.Web Security Control Center is available at the following address:
http://<Dr.Web_Server_Address>:9080
or
https://<Dr.Web_Server_Address>:9081
where <Dr.Web_Server_Address> is the IP address or domain name for the computer on which Dr.Web Server is installed.
|
Ports numbers for HTTP connection and for protected HTTPS connection are different: 9080 and 9081 correspondingly. |
In the authorization request dialogue window, specify the administrator's credentials. For default administrator:
•Name—admin.
•Password:
▫for Windows OS—password that was set during the Dr.Web Server installation.
▫for UNIX system-based OS—password that was automatically created during the Dr.Web Server installation (see also Installation Manual, p. Installing Dr.Web Server for UNIX System-Based OS).
|
Lost password can be restored. see p. Restoring the Administrator Password. |
If you connect through HTTPS protocol (secure SSL connection), the browser requests you to approve the Dr.Web Server certificate. Warnings and indications of distrust to the certificate may display, because the certificate is unknown to your browser. You need to approve the certificate to connect to Dr.Web Security Control Center. Otherwise, connection will be failed.
|
Some browsers, e.g. FireFox 3 and later report errors when connecting through HTTPS and refuse connection to Dr.Web Security Control Center. To solve this problem, add Dr.Web Security Control Center to the list of exceptions by clicking Add site in the warning message. This allows connection to Dr.Web Security Control Center. |
Dr.Web Security Control Center Interface
Dr.Web Security Control Center window (see figure below) is divided in main menu header and working area.
The main menu consists of the following items:
•Administration section,
•Anti-virus network section,
•the name of the current administrator logged into Dr.Web Security Control Center. Also, the interserver connections menu may be available,
•Events section,
•Preferences section,
•Help section,
•Logout to close the current Dr.Web Security Control Center session.
Working Area
The working area is used to perform all the main functions of Dr.Web Security Control Center. It consists of two or three panels depending on the actions which are being performed. Items in the panels are nested from left to right:
•the control menu is always located in the left part of the working area,
•depending on the selected item, one or two additional panels are displayed. In the latter case, the rightmost panel contains the settings of elements from the central panel.
The interface language must be set individually for each administrator account (see p. Managing Administrator Accounts).
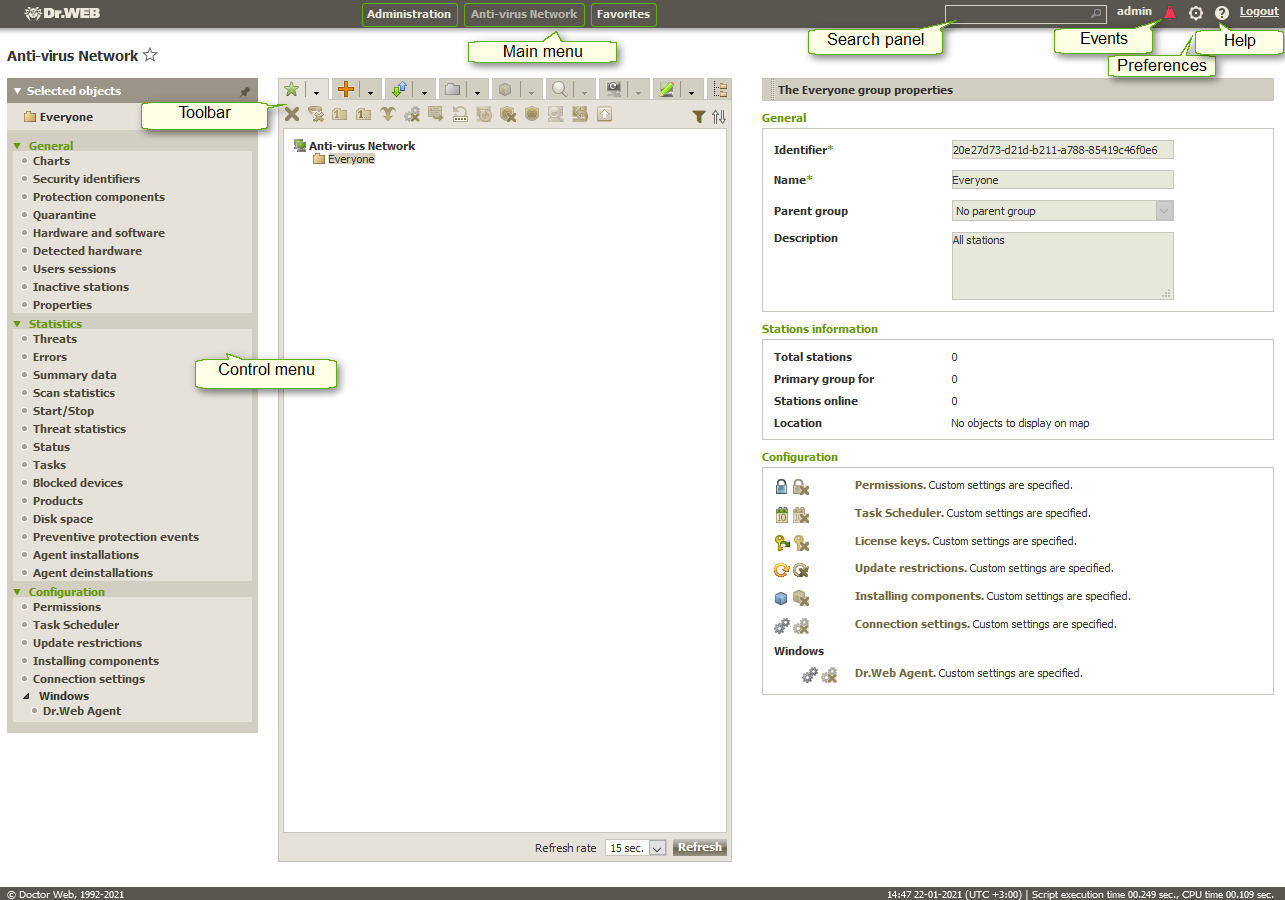
Dr.Web Security Control Center window. Click the green framed elements to open a corresponding section
To view and edit the information in the opened window, use the control menu resided in the left part of the window.
The control menu can be minimized. At this, only section names of the menu are displayed. On mouse over the correspondent section, available menu options of this section will be displayed.
To manage the control menu displaying, you the following icons in the upper right corner:
![]() Unpin menu – disable pinning and display the menu in the minimized view.
Unpin menu – disable pinning and display the menu in the minimized view.
![]() Pin menu – pin maximized menu position.
Pin menu – pin maximized menu position.
|
Information on multiserver anti-virus networking and neighbor configuration can be found in the Peculiarities of a Network with Several Dr.Web Servers section. |
If interserver connections between Dr.Web Servers are configured, the following features are added to administrator login area in the main menu.
•Name of current Dr.Web Server is shown next to administrator login.
•Clicking on administrator login opens drop-down list with connected neighbor Dr.Web Servers. If a neighbor name is not specified, its identifier will be shown instead.
Clicking on neighbor can have two possible outcomes:
▫The Control Center of a neighbor Dr.Web Server will open, if IP address of the Control Center was specified as a part of connection configuration.
The action is similar to clicking the ![]() →
→ ![]() button on the toolbar when managing neighbors.
button on the toolbar when managing neighbors.
▫If the Control Center address of this neighbor Dr.Web Server is not set, neighbor setup section will open for you to specify the IP address.