To detect malicious objects, Dr.Web products use virus databases that contain information about all known malicious programs. Regular updates of databases allow the detection of previously unknown viruses, blocking their distribution, and in some cases curing previously incurable infected files. Besides virus databases, Dr.Web software components and help documentation are updated as well.
For Dr.Web to update, you need a connection to the internet or to the update mirror (local or network folder), or to the Anti-virus network with at least one computer that has an update mirror set. Customizing of update source settings can be done in General → Update. The details of customization of Dr.Web updating parameters is located in Update section.
Update relevance check
To check the relevance of virus databases and program components, open Dr.Web menu ![]() . If updates are relevant, the Update item is highlighted in green.
. If updates are relevant, the Update item is highlighted in green.

Figure 14. Dr.Web menu
If updates are required, the Update is required highlighted in red appears:
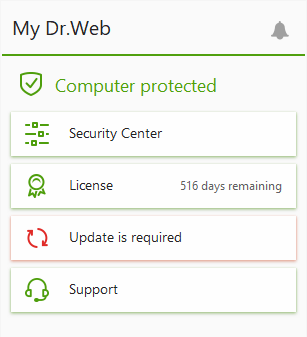
Figure 15. Update required
During the update, Dr.Web downloads all updated files that correspond to your version of Dr.Web and upgrades Dr.Web if a newer version is available.
|
After an update of executable files, drivers, or libraries, a restart may be required. In such cases, an appropriate warning displays. You can set any convenient time for the restart or pick a time for the next reminder. |
To start update from Dr.Web menu ![]()
1.Open Dr.Web menu ![]() , then select Update. Depending on relevance of virus databases and program components, the color of this menu item can vary.
, then select Update. Depending on relevance of virus databases and program components, the color of this menu item can vary.
2.This opens information on relevance of Dr.Web virus databases and other components as well as the date of their last update. Start updating by clicking Update.
To start update from the command line
1.Open the Dr.Web installation folder (%PROGRAMFILES%\Common Files\Doctor Web\Updater).
2.Run the drwupsrv.exe file. The list of command-line parameters can be found in Appendix A.
Update and statistics logs
To view update history on Statistics tab
1.Open Dr.Web menu ![]() .
.
2.Select Security Center.
3.Open the Statistics tab.
4.Click the Detailed Report tile.
Dr.Web update logs are stored in dwupdater.log file located in the %allusersprofile%\Doctor Web\Logs\ folder.
![]() How to set update of databases and components without internet access?
How to set update of databases and components without internet access?
If the computer is connected to the local network, you can choose to update the virus databases and components using the update mirror created on another computer with Dr.Web product installed (Security Space, Anti-virus for Windows or Anti-virus for Windows Servers). The computer on which the update mirror is created should have the internet connection. The product version should be the same. More information on how to create an update mirror You can set the update from the update mirror in two ways: To set the update when the computer is connected to the anti-virus network 1.Enable remote control of Dr.Web product in Anti-virus network section of settings window. 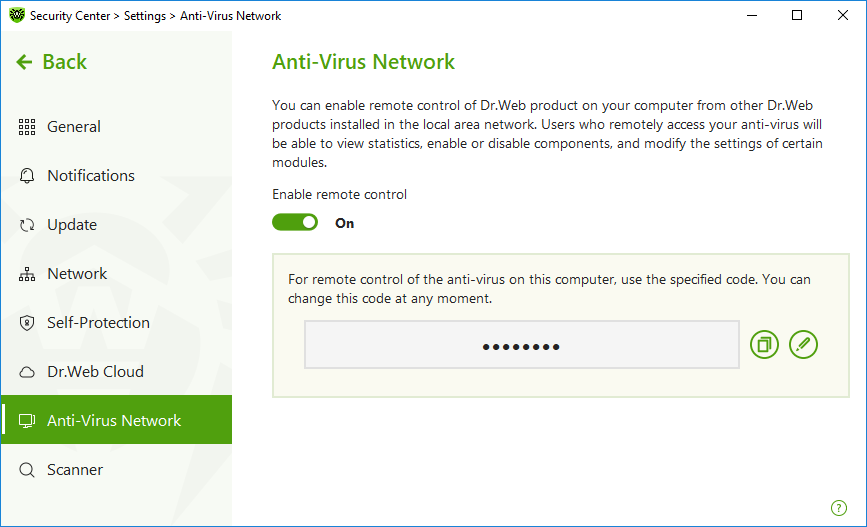 Figure 16. Switching on the remote access 2.Go to Settings → Update window. 3.In the Update source section, click Edit and then select Anti-Virus Network from the drop-down list.  Figure 17. Selecting the update source 4.Select the computer that will be used to update program virus databases and components. 5.Click OK. To set the update from local or network folder 1.Go to Settings → Update window. 2.In the Update source section, click Edit and then select Anti-Virus Network from the drop-down list. 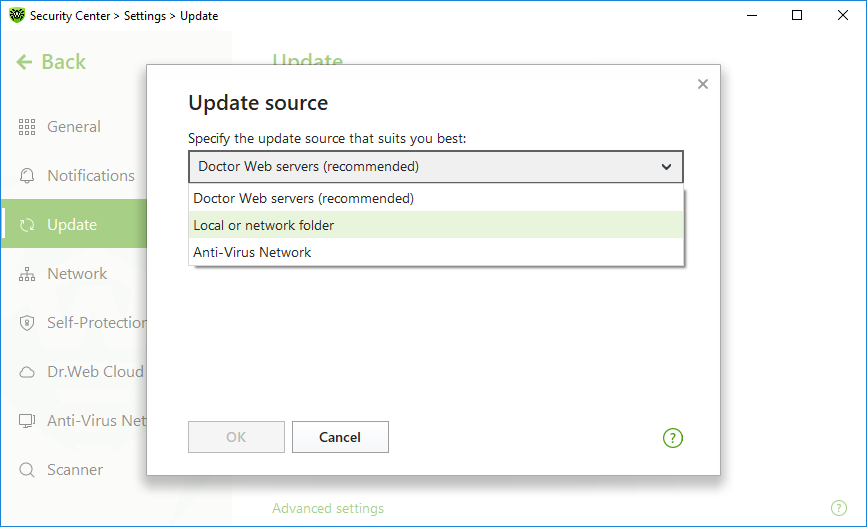 Figure 18. Selecting the update source 3.In the Path to the update mirror field, specify the folder that contains files of the created update mirror. For this, click Browse button and select the required folder, or enter the path manually using UNC. 4.Enter the Login and Password to the folder you try to connect, if necessary. Login is the user name of the account on the computer that contain network folder. Login requires the computer name in the local network and full path to the folder. Password is the account password. 5.Click OK. |