|
To install Dr.Web, the user must have administrative privileges. |
Installation via the command line
To install Dr.Web in the background mode, enter in the command line the executable file name with necessary parameters (they affect installation in the background mode, installation language, reboot after installation, and Dr.Web Firewall installation).
Parameter |
Value |
|---|---|
installFirewall |
Install Dr.Web Firewall. |
lang |
Language used for the installation. The value of this parameter is language in ISO 639-1 format. |
reboot |
Restart the computer automatically after installation is complete. |
silent |
Installation in the background mode. |
For example, to start background installation of Dr.Web with reboot after the process completes, execute the following command:
drweb-11.5-ss-win.exe /silent yes /reboot yes
Installation in wizard mode
To start usual installation, do one of the following:
•If you have the executable file, run it.
•If you have the original disk containing installation package, insert the disk into the CD/DVD drive. If autorun is enabled, the installation will start automatically. If autorun is disabled, run the autorun.exe file of the installation kit manually. The window opens and displays the autorun menu. Click Install.
At any installation step, before the wizard starts copying files to your computer, you can do the following:
•Return to the previous step by clicking Back.
•Go to the next step by clicking Next.
•Abort installation by clicking Cancel.
Installing Dr.Web
1.If other anti-virus software is installed on your computer, the Installation Wizard informs you on incompatibility between Dr.Web and another anti-virus product and offers to remove it.
|
Before the installation starts, the Wizard checks if the installation file is the latest one. If a newer installation file exists, you will be offered to download it before the installation. |
2.At this step, you are prompted to connect to Dr.Web cloud services, which allow to perform checks using the newest information on threats. The information is updated in real-time mode. The option is enabled by default. You can also specify whether Dr.Web Firewall should be installed or not.
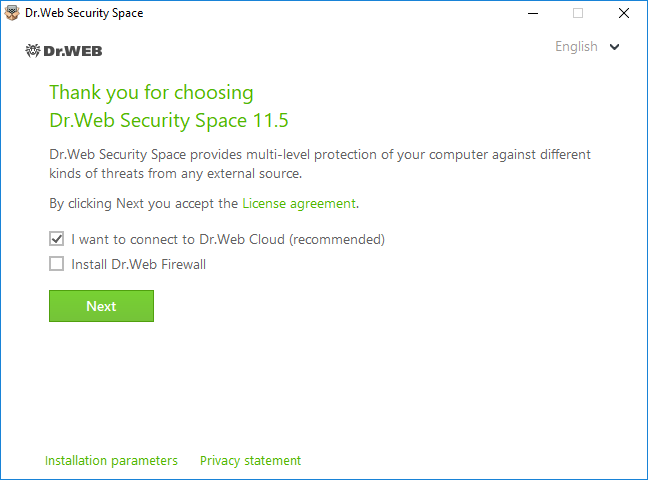
Figure 1. Installation Wizard
3.To select components you want to install, specify the installation path and configure other settings, click Installation parameters. The option is meant for experienced users. If you want to use default installation settings, go to step 4.
•On the first tab, you can specify the components you want to install.
•On the second tab, you can change the installation path.
•The last tab of the window allows you to enable the Update during installation option to download updates to virus databases and other program components. The tab also prompts you to create shortcuts to Dr.Web.
•If necessary, specify proxy server parameters.
To save the changes, click OK. To close the window without saving the changes, click Cancel.
4.Click Next. Please note that by clicking the Next button you accept the terms of the License agreement.
5.In Registration Wizard window select one of the following options:
•If a key file is present on the hard drive or removable media, select Specify path to an available valid key file. To select the key file click Browse and select it in dialog box. More information can be found in Activation using the key file section.
•If you do not have the key file, but you are ready to obtain it during the installation, select Receive license during installation. More information can be found in Activation using serial number section.
•To continue installation without a license, select Receive license later. Updates are not available until you specify or obtain a key file.
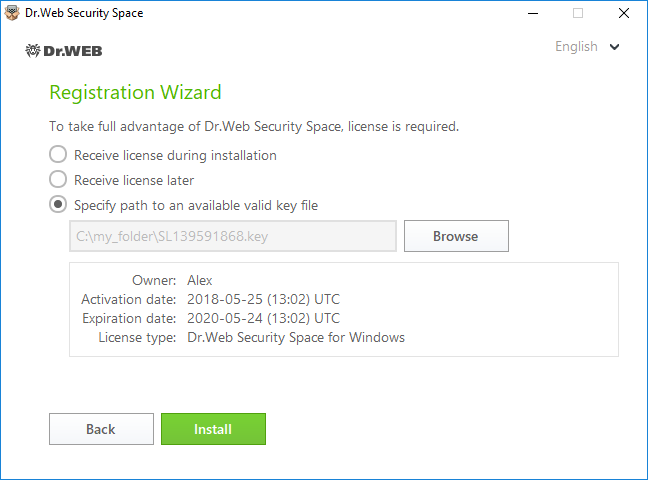
Figure 2. Registration wizard
Click Install.
6.If you specified a key file or received it during the installation and did not clear the Update during installation check box, the wizard updates virus databases and other Dr.Web components. Updating starts automatically and does not require any additional actions.
7.Restart your computer after the installation is complete.
BFE service error while installing Dr.Web
Several Dr.Web components require the BFE (Base Filtering Engine Service) running. In case this service is absent or damaged, the installation of Dr.Web will not be possible. The damage or the absence of BFE service may indicate the presence of security threats on your computer.
If the attempt of Dr.Web installation has ended with error, do the following:
1.Scan the system using free CureIt! utility by Doctor Web. You can download CureIt! from Doctor Web website: https://free.drweb.com/download+cureit+free/.
2.Restore BFE service. To do this, you can use the Windows firewall recovery utility (for Windows 7 and later). You can download the utility from Microsoft website: https://support.microsoft.com/en-us/help/17613/automatically-diagnose-and-fix-problems-with-windows-firewall.
3.Run Dr.Web installation wizard and perform the installation according the instruction described above.
If the problem continues to appear, address to Doctor Web technical support.