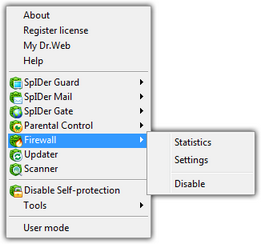
Dr.Web Firewall installs as a network component and loads on Windows startup. If necessary, you can suspend Dr.Web Firewall operation, review its statistics, or change settings.
|
After a session under a limited user account (Guest) is open, Firewall displays an access error message. Firewall status is then displayed as inactive in SpIDer Agent. However, Firewall is enabled and operates with default settings or settings set earlier in administrative mode. |
SpIDer Agent provides you with the main Dr.Web Firewall management and configuration features. Click the SpIDer Agent icon ![]() and select the Firewall group to access them:
and select the Firewall group to access them:

Option |
Description |
|---|---|
Statistics |
Displays information on events which Dr.Web Firewall handled. |
Settings |
This item is not available in User mode. Opens Dr.Web Firewall settings. You can restore settings to their default values on the Restore page of Dr.Web Main settings. |
Disable/Enable |
This item is not available in User mode. Suspend or resumes Dr.Web Firewall operation. The Enable option displays in the menu only when operation was suspended. |
Temporal Suspension
You can temporary suspend anti-virus checks that Dr.Web Firewall runs on incoming and outgoing HTTP traffic.
|
This option is not available in User mode. |
Be cautious when using this option. |
To disable Dr.Web Firewall
Click the SpIDer Agent icon ![]() in the notification area, select Firewall, and then select Disable.
in the notification area, select Firewall, and then select Disable.
|
To disable Dr.Web Firewall, enter confirmation code or password (if you set Protect Dr.Web settings by password checkbox on the Self-protection page in Dr.Web Main settings). |
To enable Dr.Web Firewall
Click the SpIDer Agent icon ![]() in the notification area, select Firewall, and then select Enable.
in the notification area, select Firewall, and then select Enable.