The list of threats detected by Scanner and SpIDer Guard during the current Dr.Web for Linux session is displayed on the special window page which is available only if at least one threat was detected.
If threats were detected, you can open this page by clicking the ![]() button on the GUI navigation pane.
button on the GUI navigation pane.
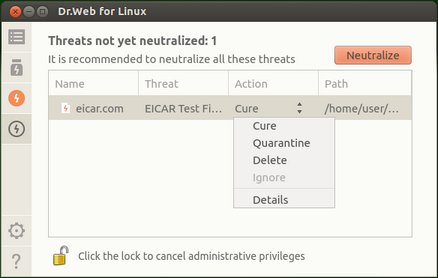
Picture 33. Page with listed threats
In the list, the following information is available for each detected threat:
•Name of the malicious object
•Name of the threat (according to the Doctor Web classification)
•Action applied (or to be applied) to the threat
•Path to the malicious object
Neutralized threats display in the list as grayed out items.
Neutralizing detected threats
If some of the listed threats are not neutralized, the Neutralize button above the list becomes available. Once the button is clicked, actions specified in the corresponding Action fields are applied to the threats. If an attempt to neutralize a threat fails, the listed item is displayed red and an error message appears in the Action field.
By default, an action to be applied to a threat is selected according to the settings of the component which detected the threat. You can configure actions applied to threats of a certain type by Scanner and SpIDer Guard. For that purpose, open the corresponding tab on the Settings window and adjust the settings.
If it is necessary to apply an action which is different from the one specified in the settings, click the Action field and select the required action on the menu.
You can select multiple items in the threat list at a time. To do that, select the items with a mouse button while holding down CTRL and SHIFT keys.
•When you hold down a CTRL key, threats are selected one by one.
•When you hold down a SHIFT key, threats are selected contiguously.
After you select threats, you can apply a required action to them by right-clicking in the selected area and then clicking the required item on the displayed menu. The action selected on the menu is applied to all of the selected threats.
|
Note that •If a threat is detected in a complex object (archive, email message, etc.), the selected action is applied to the container as a whole (and not to only the infected object); •The Cure action can be applied not to all threat types. If required, elevate application privileges to enable successful neutralization of threats. |
Viewing information on threats
For details on a detected threat, right-click the item with information on the threat and then click Details on the displayed menu. After that, a window opens that contains detailed information on the threat and objects that contained the threat. To view information on multiple threats at a time, select the required items with a mouse button while holding down a CTRL key.
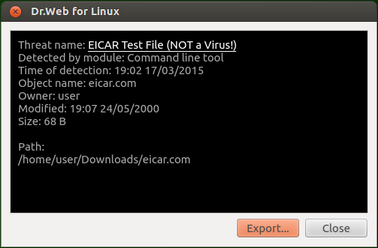
Picture 34. Information on a threat
In this window, the following information is available:
•Name of the threat (according to the Doctor Web classification)
•Name of the Dr.Web for Linux component which detected the threat
•Date and time of the detection
•Information on the file system object where the threat was detected: object name, owner, date of the latest modification and path to the object in the file system
•Last action applied to the threat and the result (if an option to apply actions to threat automatically is enabled for the component, for example – in a corresponding tab of the application settings window).
Clicking a threat name link opens a webpage with information on the threat in your browser (a threat name is a link to the official Doctor Web website; a valid Internet connection is required). You can also save the displayed information by clicking Export (once you click the button, a window where you can select a file for saving opens).
To close the window with details on a threat and infected object, click Close.