On the Scheduler tab, you can enable an option to scan objects automatically according to the schedule as well as specify this schedule and select the scanning type.
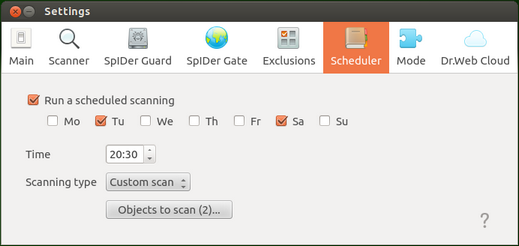
Picture 62. Scheduler tab
To enable automatic scheduled scans, select the Execute a scheduled scanning check box. In this case, Dr.Web for Linux creates a task for the scheduler to periodically start scanning.
|
The scheduler starts scanning at the specified intervals regardless of whether Dr.Web for Linux is started or not. If Dr.Web for Linux is operating in Central protection mode and launch of scanning by user demand is prohibited on the central protection server, Scanner will not launch scheduled scanning tasks. Scanning started according to the schedule as well as scanning on demand is configured with the settings specified on the Scanner tab. |
Configuring scheduled scanning
If scheduled scanning is enabled, you can configure the following parameters:
•Days of week when scanning is to be started (by selecting the corresponding check boxes)
•Time (hours and minutes) when scanning is to be started
•Scan type (Fast, Full, or Custom)
•If you select Custom scan type, you can specify the list of objects to be scanned. For that purpose, click the Objects to scan button (number of selected objects is indicated within the brackets).
After that, select the necessary object in the appeared window which is similar to the file chooser for custom scanning on demand. You can add objects to the list either by clicking the "+" button or by dragging and dropping them from the File manager window.
To disable scheduled scanning, clear the Execute a scheduled scanning check box. The respective task is automatically removed from the cron task list.