Scanning Types
On user demand, scanning in one of the following modes can be started:
•Express scan – scan of critical system objects that are at high risk to be compromised (boot records, system files, etc.)
•Full scan – scan of all file system objects available for the user under whom Dr.Web for Linux is started
•Custom scan – scan of file system objects or other special objects specified by the user
|
If Dr.Web for Linux is operating in Central protection mode and launch of scanning at user request is prohibited on the Central protection server, this page is disabled. Scanning can increase processor load, which can cause the battery to discharge faster. Thus, it is recommended to perform a scan of a portable computer when it is plugged in. |
Starting Scanning
To start scanning, click the Scanner button on the Main page.
The page with scan types opens. To start Express or Full scan, click the corresponding button. Once one of these buttons is clicked, scanning process automatically starts.
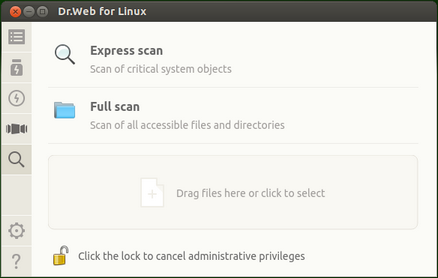
Picture 26. Select scan type page
|
Scanning is performed with current application privileges. If the user whose privileges are currently active does not have superuser permissions, all files and directories that are not accessible to this user cannot be scanned. To enable check of all required files on which you do not have owner permissions, elevate the application privileges before scanning starts. For details, refer to the Managing Application Privileges section. |
To start Custom scan of certain files and directories, do one of the following:
•Drag and drop required objects
Drag and drop required files and directories from the system File Manager window to the area marked with a special label Drag files here or click to select. You can also drag and drop the objects to the Main page.
When dragging objects over the page, it changes to the pane indicated with the Drop files here label. To start scanning, drop the dragged objects onto the target area by releasing the mouse button.
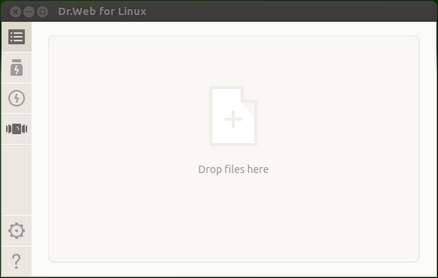
Picture 27. Target area where objects are dropped for scanning
•List the objects to be scanned.
To select the objects for scanning, click the target area. The window where you can select system objects for Custom scan opens.
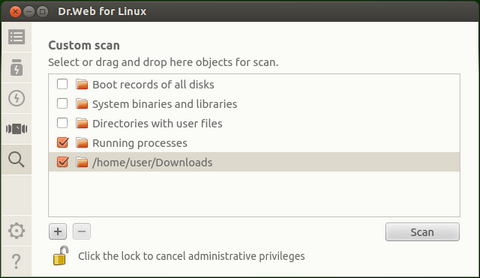
Picture 28. List of objects for scanning
The list of objects for Custom scan contains four predefined items:
oBoot records of all disks. If you enable this item, all boot records of all available disks are selected for scanning.
oSystem binaries and libraries. If you enable this item, all directories with system binaries are selected for scanning (/bin, /sbin, etc.);
oDirectories with user files. If you select this item, all directories where user files and files of the current session reside are selected for scanning (/home/<username> (~), /tmp, /var/mail, /var/tmp).
oRunning processes. If you select this item, binary executable files containing code of currently running processes are selected for scanning. At that, if a threat is detected, not only the malicious object is neutralized but also the active process is terminated.
Editing the list of Custom scan objects
If required, you can add custom paths to the list of objects for scanning. For that purpose, drag and drop necessary objects (paths to the objects are automatically added to the list) or click the "+" button below the list. In this case, a standard dialog window opens, where you can select required objects (a file or a directory). After you select an object, click Open. To remove all selected paths from the list, click the "–" button.
|
Hidden files and directories are not displayed in the file chooser by default. To view such objects, right-click the list of files in the file chooser and select Show hidden files. The first four items in the list are predetermined and cannot be removed even if the corresponding check boxes are selected. Moreover, if at least one of the predetermined item is selected, the "–" button is unavailable. |
Starting Custom scan of listed objects
To start Custom scan of listed objects, select all required files or directories and click Scan. Once the button is clicked, scan of the selected objects starts.
After scanning starts, the task is added to the queue which contains all scanning tasks of the current session: complete tasks, tasks in progress, and pending tasks. You can view the list of tasks and manage them on the scan task management page.