In graphics mode, License manager allows to view information on the current license issued for the Dr.Web for Linux user. License data is stored in a license key file that provides operation of Dr.Web for Linux on the user computer. If neither license key file nor demo key file is found on the computer, all Dr.Web for Linux functions (including file check, file system monitoring, virus database update) are blocked.
License Manager page is available in the Dr.Web for Linux graphical interface. To open the page, on the Main page click License.
If a demo key file or license key file for Dr.Web for Linux to use is found, the License Manager start page displays license information including license number, license owner, and duration period. This information is retrieved from the corresponding key file.
The picture below shows appearance of the License Manager page.
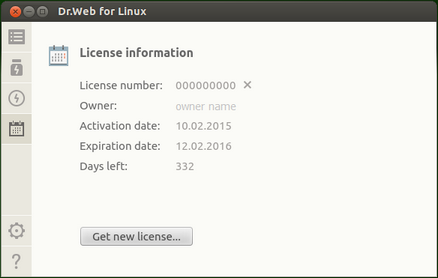
Picture 38. License information page
To delete a license key file, click the cross icon next to the license number.
To close a License Manager page, select another Main window page by clicking a corresponding button on the navigation pane.
To activate a license via License Manager and obtain the corresponding key file providing functionality of Dr.Web for Linux (which includes purchasing a new license or renewing the current one) or obtain a demo license, click Get new license... After that, the registration wizard opens. Note that the registration wizard also opens automatically when Dr.Web for Linux is first started after its installation.
On the first step, select the activation type which can be one of the following:
1.Activation of license or demo period using a serial number
2.Obtaining a demo period
3.Installation of a key file obtained earlier
4.Activation of Dr.Web for Linux via the central protection server
|
To register a serial number and obtain a demo key file, a valid Internet connection is required. |
1) Activation of license or demo period using a serial number
To activate a license or demo period, enter the serial number in the text field and click Activate.
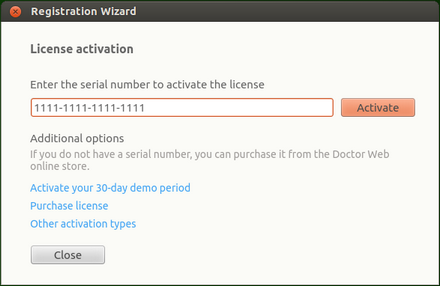
Picture 39. Registration using a serial number
|
If you do not have a serial number or a valid key file, you can purchase license on the Doctor Web official website. To open the online store page, click Purchase license. For information on other ways to purchase the license for Dr.Web products, refer to the Licensing section. |
Once you click the Activate button, connection to the Doctor Web registration server is established.
If the serial number, which you specified on the first step, was obtained from the Doctor Web website and issued for a three month's demo period, further steps are not required for its activation.
If the specified serial number corresponds to the license for using Dr.Web for Linux on two computers, you need to select on how many computers you would like to use the product. If you select On two computers, you can activate the second serial number on another computer and receive another license key file. The registered licenses will have the same validity period (for example, one year). If you select On one computer, you should specify the second serial number from the purchased kit. In this case, you cannot register this serial number later on another computer (neither can you use a copy of the license key file resulting from sequential activation of the serial numbers), but the duration of the current license is doubled (for example, extended to two years if the license period is one year).
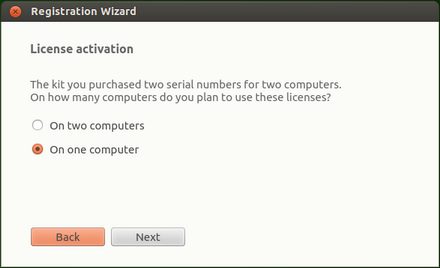
Picture 40. Selecting the number of computers
After you select the number of computers on which you would like to activate the license, click Next, and if you have selected On one computer, in the next wizard page specify the second serial number and then click Next.
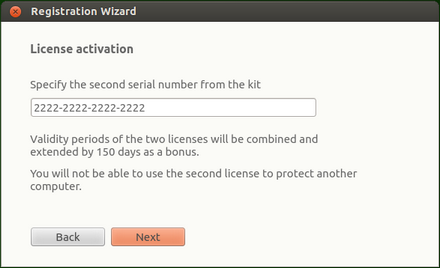
Picture 41. Specifying the second serial number from the kit
In next step, you are prompted to receive a bonus and extend the license period for 150 days. To receive the bonus, select Specify the previous license. If you do not want to receive the bonus or do not have a previous license, select I do not have a previous license. Then click Next.
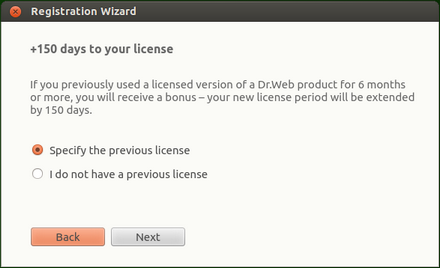
Picture 42. The bonus prompt
If in the first step you have specified a special renewal serial number, you will not be shown a bonus prompt in this step. Instead, you will be prompted to specify a previous license to avoid reducing the validity period of the renewal license by 150 days. If in this step you select I do not have a previous license, the validity period of the new license will be reduced by 150 days.
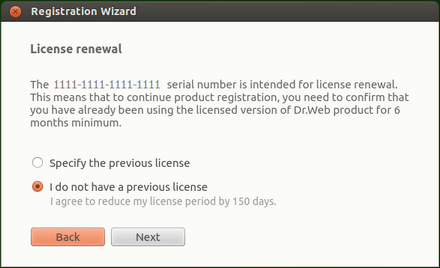
Picture 43. License renewal
If you have selected Specify the previous license, in the subsequent wizard page specify the previous license's serial number or its key file.

Picture 44. Specifying a previous license
If you specify a license which is not expired, the new license period will be extended by the remaining period of the previous license. If you activate a license with two serial numbers, the available bonus will depend on the option you specified in the previous step.
•On two computers, and this computer is the first one. To enable the bonus of 150 days for the first computer, specify the previous license issued for this computer (if any). Do not specify the second serial number here.
•On two computers, and this computer is the second one. To enable the bonus of 150 days for the second computer, specify the previous license issued for this computer (if any). Do not specify the first serial number here.
•On one computer. In this case, not only the duration of the purchased licensed is doubled, but also the license period is extended for 150 days. Moreover, if you specify the previous license issued for the second computer, the doubled period of the new license will be extended by another 150 days (and by the remaining period of the previous license).
To specify the previous license, you can either enter its serial number in the corresponding box or specify its key file. To do so, select a corresponding option in a combo box, which is placed on the left of the edit box. To specify the key file, do one of the following:
•Specify the file path in the entry filed
•Specify the file via the standard file chooser by clicking the Browse button
•Drag and drop the file from the file manager window to the window of the Registration wizard
Note that you can specify the zip archive containing the key file without unpacking it.
To continue the registration, click Next.
On the next step, specify registration data including the following:
•Registration name
•Your region (country), which is selected from the list
•Correct email address
All registration form fields are mandatory.
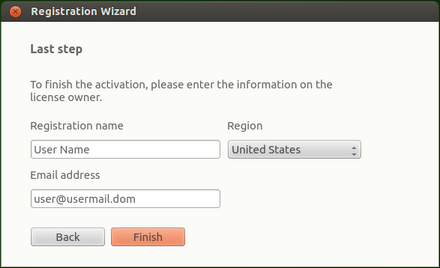
Picture 45. User information page
After all fields are filled in correctly, click the Finish button to establish a server connection and obtain a license key file. If necessary, you can use the license key file on another computer after you remove it from this computer.
If you would like to activate a demo period that provides full functionality of Dr.Web for Linux components for a period of 30 days, in the first step of activation click the link Activate your 30-day demo period.
|
When activating a demo period for 1 month, you do not need to provide your personal data. However, you can register on the official Doctor Web website and obtain a serial number for three month's demo period. Another demo period for the same computer can be obtained after a certain time period. For details, refer to the Licensing section. |
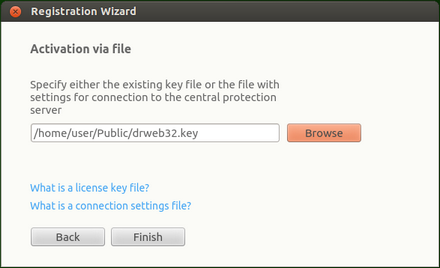
3) Installation of a key file obtained earlier
If you already have a valid license and the related key file (for example, obtained from Doctor Web or Doctor Web partners via email), you can activate Dr.Web for Linux by installing this key file. For that purpose, click Other activation types in the first step and specify the key file path in the displayed box.
Picture 46. Activation via key file
To specify the key file, do one of the following:
•Specify the file path in the entry filed
•Specify the file via the standard file chooser by clicking the Browse button
•Drag and drop the file from the file manager window to the window of the Registration wizard
Note that you can specify the zip archive containing the key file without unpacking it.
After you specify the key file path (or the path to the archive containing the key file), click Finish to install the key file automatically. If required, the key file is automatically unpacked and copied to the directory with Dr.Web for Linux files. An Internet connection is not required.
4) Activation of Anti-virus via the central protection server
You can activate your Dr.Web for Linux by connecting it to the central protection server which allows for central administration of the anti-virus network. In this case, the server generates a key file required for Dr.Web for Linux operation. Choose this activation type only if the provider or corporate network administrator delivered a special file which stores settings for connection of your Dr.Web for Linux to the central protection server.
To connect the Dr.Web for Linux to the central protection server, click Other activation types on the first step, specify the path to the settings file as described in the previous paragraph.
To specify the key file, do one of the following:
•Specify the file path in the entry filed
•Specify the file via the standard file chooser by clicking the Browse button
•Drag and drop the file from the file manager window to the window of the Registration wizard
Note that you can specify the zip archive containing the key file without unpacking it.
After you specify the path to the settings file (or the archive containing this file) click Finish to establish connection to the central protection server (a network connection is required).
After the activation procedure completes (regardless of the selected activation type), the final page of the wizard with the corresponding notification displays. Click OK to exit the wizard and open the Main page of the Dr.Web for Linux.
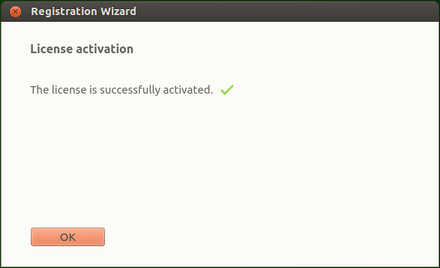
Picture 47. Successful activation notification
If an error occurs on any step of the procedure, a page with the corresponding notification and short error description is displayed. The picture below shows an example of such a page.
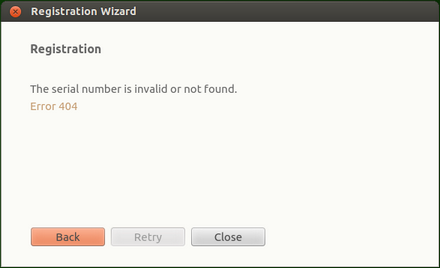
Picture 48. Error message
If an error occurs, you can return to the previous step and make corrections (for example, correct the serial number or specify the correct file path). To return to the previous step, click Back.
If the error is caused due to a temporary problem (for example, temporary network failure), you can attempt to retry the operation by clicking Retry. If necessary, you can click Close to cancel the registration and exit the wizard. In this case, you need to retry the registration procedure later. If the wizard cannot establish a connection to the Doctor Web registration server to verify the serial number, the following page is displayed.
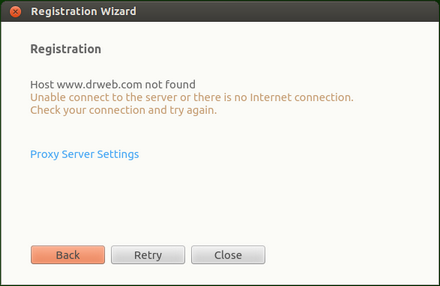
Picture 49. Registration server connection error
If the error has occurred because your computer cannot use a direct Internet connection, but you use a proxy server to access the Internet, click the link Proxy Server Settings to open the window containing proxy server settings:
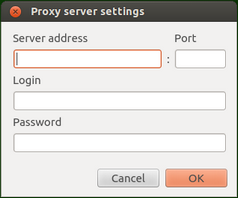
Picture 50. Proxy server settings
Specify the proxy server settings and click OK. After that click Retry to resume the registration.
|
Note that upon activation of a new license and generation of a new key file, the previous key file, used by Dr.Web for Linux, is automatically saved as a backup copy to the /etc/opt/drweb.com directory. If required, you can enable use of this key file again by installing it. |
If necessary (for example, if you decided to use Dr.Web for Linux on another computer), you can delete an installed license key file that manages Dr.Web for Linux operation. For that purpose, open the page with license information (the start page of License manager) and click the cross icon next to the number of the current license.
After that, confirm deletion of the license key file in the appeared window by clicking Yes. If you want to cancel the deletion, click No.
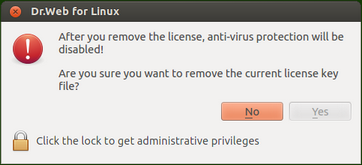
Picture 51. Confirmation dialog before deleting a license key file
|
To delete a license key file, the application must be started with superuser privileges. If the application does not have elevated permissions, the Yes button is unavailable on attempt to delete a key file. If required, you can elevate the privileges and, if the elevation succeeds, the Yes button becomes available. Deletion of a license key file does not affect the license validity period. If the license is not expired, you can obtain a new key file for this license for the remaining period. |
After a license key file is deleted, all anti-virus functions of Dr.Web for Linux (file scanning, virus database updating, file system monitoring) are blocked until a new license or demo period is activated.